Monday, December 9, 2013

Self-Striping Hand Spun Art Yarn

I have a signature yarn color-way called "All Colors Self-Striping™" that self-stripes.  Here is an example of that yarn knitted up by Michele from Easy123 on Etsy.

If you want yarn like this - visit my shop or email me.

This cowl was made from 120 yards of my handspun on size US#13.  You can bump up to a US#15 or US#17 to make the yarn go farther, a little more drape and a little lacier look.

Didn't Michele do an awesome job?  And you can see what I mean by self-striping very clearly in the first picture.


Wednesday, February 27, 2013

Alpaca Cowl - Part 5 (The Cowl)


Here are some pics of the finished cowl.  I think it came out great!!  Heather (my client) loved it!  I am modifying the pattern for publication and it will be up soon.  

If you would like a cowl - feel free to contact me - I would love to make one for you.  

Wednesday, February 6, 2013

Alpaca Cowl - Part 4 - (Finished Yarn)

Here is some pics of the finished yarn.  Brandy was spun thin and even.  Rosalita was spun thick and thin and with some bumps.  Together it makes quite an interested finished product.  I love the way it turned out!


Next time . . . the finished cowl


Tuesday, January 29, 2013

Alpaca Cowl - Part 3 (Still in the fiber studio)

Step 7 - Prepping the fleece (continued) 

Now onto prepping Rosalita's fleece.

After the fleece has dried thoroughly (fiber tools don't like wet fleece), we start the real work :)
Washed Fleece (Rosalita) before combing


Rosalia's fleece needed to be combed to remove as much VM as possible.  Any of those of you that spin know that an occasional piece of VM is ok, but when you have to stop every inch to remove something, it takes the joy out of spinning, so I wanted to remove as much as possible.

I started on my blending hackle (pictured) and my 2 row combs (which I use for most things).


Adding the fiber to the blending hackle

I combed the fiber from the hackle to the comb and back (pictured), and still had some residual VM.

The fiber after it has been combed 2x

Soooo I moved to my 4 row hand combs and abandoned the hackle.  Of course this slows down the process, but I wanted it clean.

Here is a picture of the waste on the 4 row combs after combing 2x.  There was a lot of VM in there, but what I got with the 4 row combs was a nice clean BEAUTIFUL fleece!!!  (The fiber looks so light because it was so sunny in my fiber studio that day).


The waste from the combing process


So you may ask, what do I do with all the "waste fleece" from combing?  Typically if a fleece is a combed, shorts are left and this can be used in the drum carder (or blending board) to make textured yarn, but when there is THIS much VM in the "waste" - I use it in my bird nesting balls.


I then used my blending board again.  Yes, I could have carded the fibers into a batt, but it was nicely combed and as I said in my last post - I AM OBSESSED with the blending board :)

Here is the fiber on the board before I doweled it off into rolags.  Some cultivated silk and white firestar accent the rose grey fiber beautifully!!!
Rosalita, silk, and sparkle on the blending board

A Rosalita Rolag

Much combing and many rolags later and here is both plys of yarn getting ready to become a unified yarn. I spun Rosalita's ply thick and thin because Heather wanted an artsy look . . .

Brandy on the left and Rosalita on the right


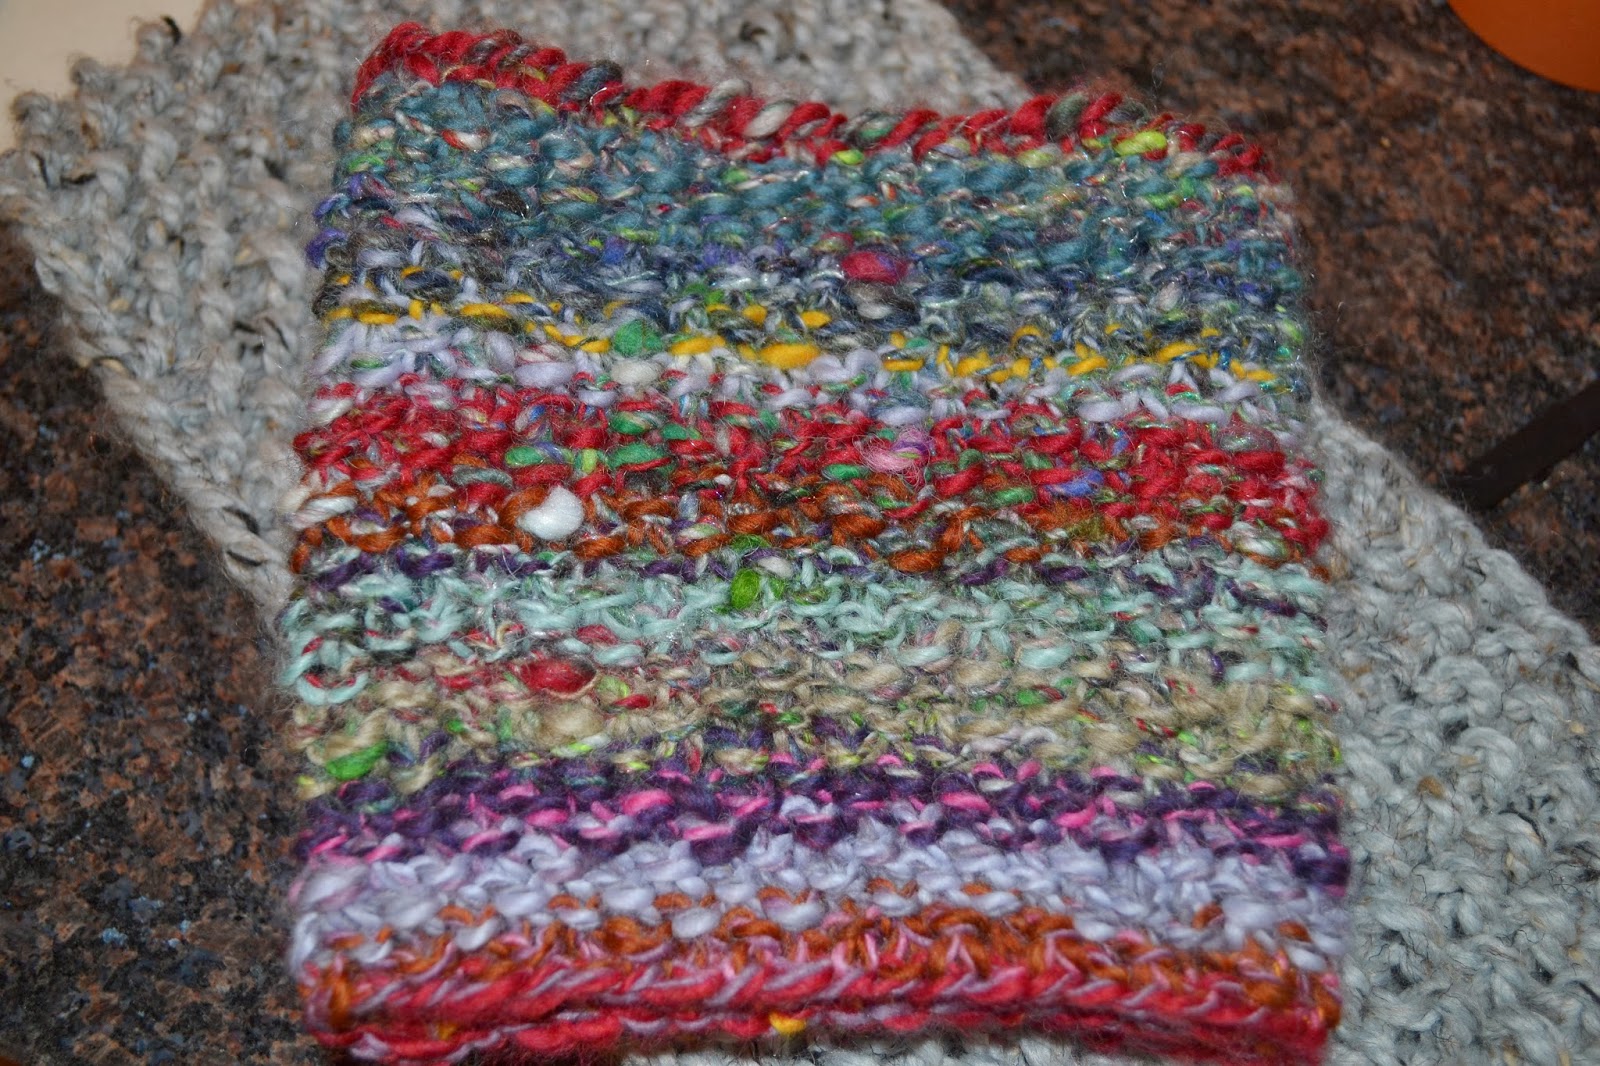
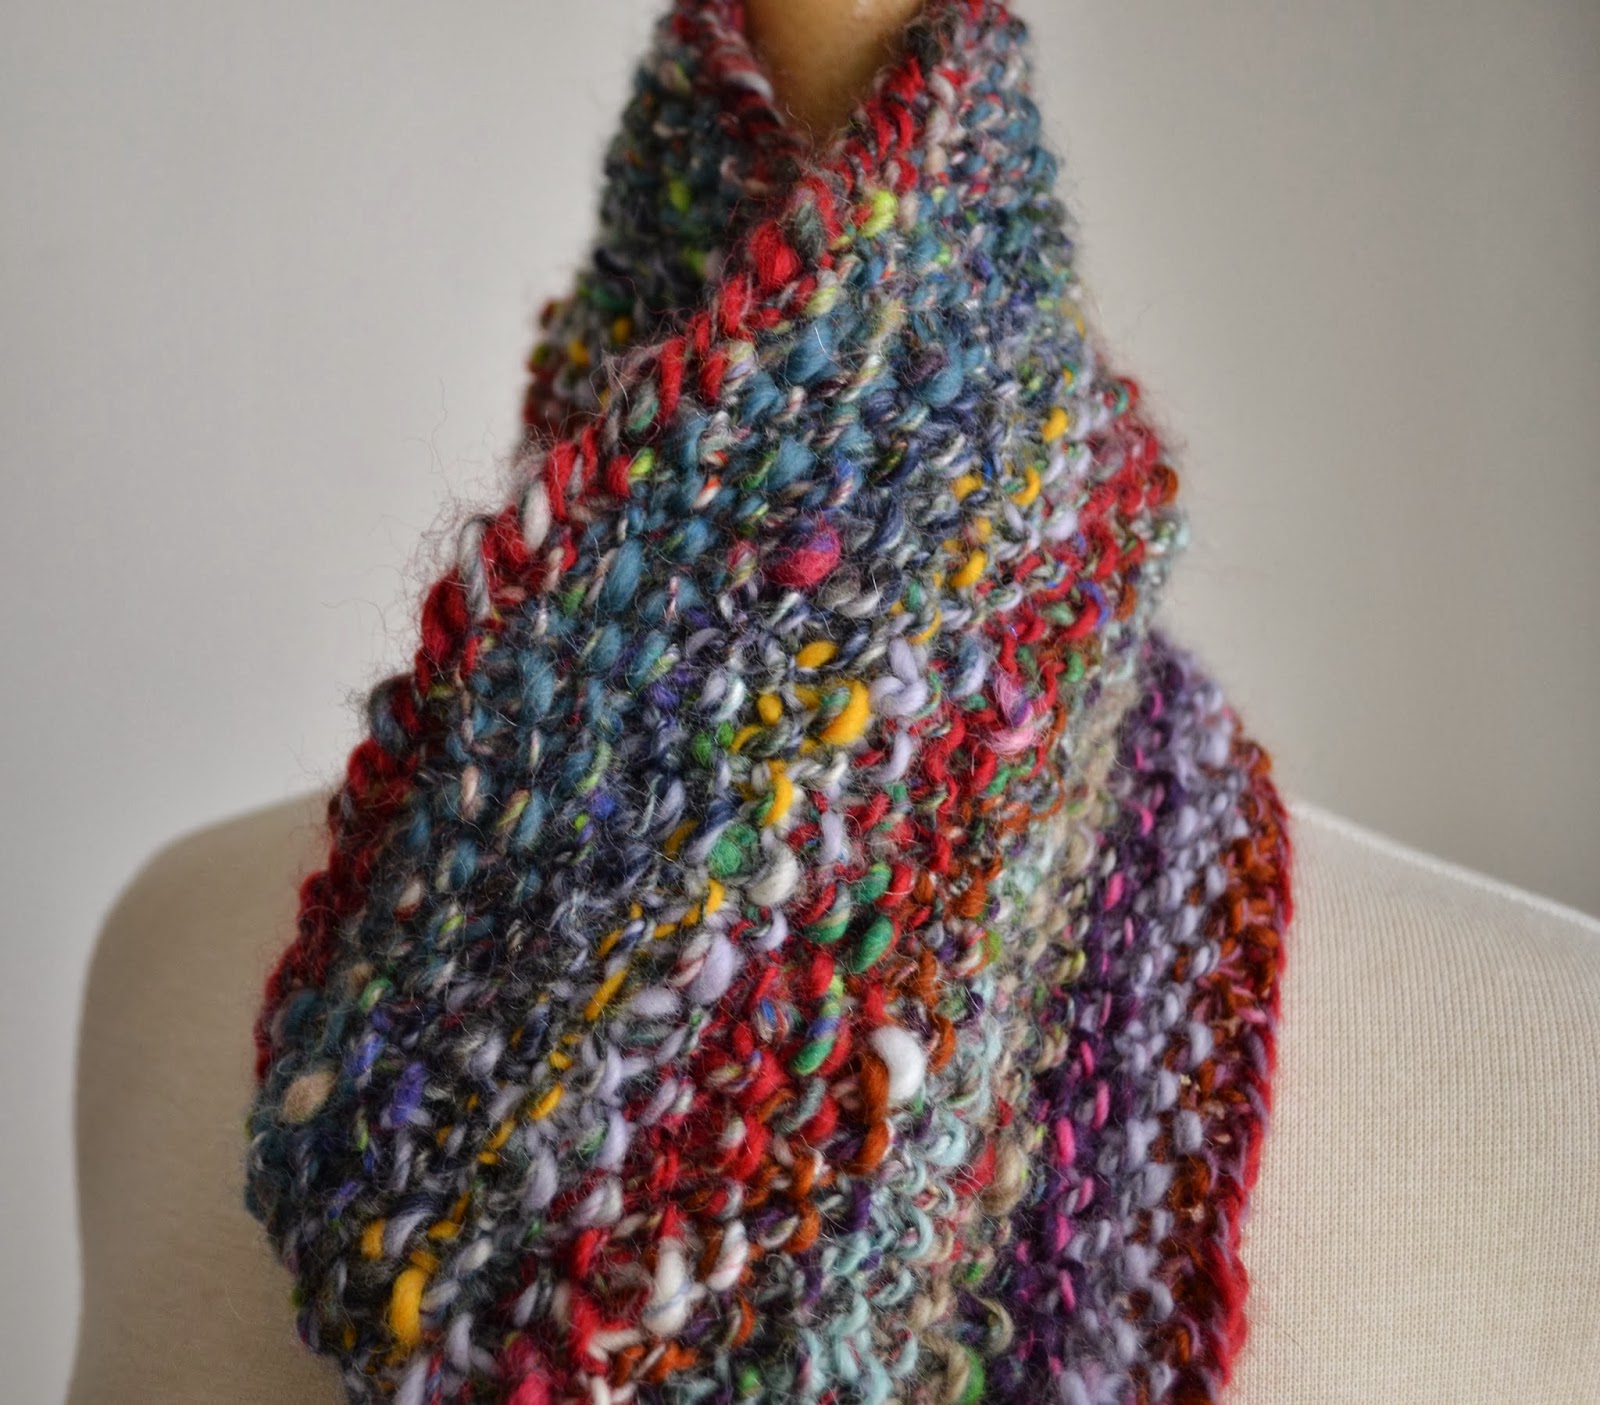
Next time - the finished yarn and cowl.  . . . 


Alpaca Cowl - Part 2 (moving to the fiber studio)

Now back to our series on an alpaca cowl . . . the Noro virus had me out for a few days, and a customer of mine joked that it must be because we knit with too much Noro yarn since she also was ill.  (If you didn't get that joke, you must not be a hard core knitter).  :)


Step 5 - Picking the Fleece  (Optional) 
Picking alpaca fleece is an optional step as alpacas do not have the tight lock formation as some wool breeds (like merino) does.  I do pick fleece when necessary such as when the fiber is really full of VM (vegetable matter) or there is a little matting from washing or just from rolling.  I also use my picker to blend fibers and colors.  So yes my picker does get a work out with alpaca - but not in the traditional way wool picking is done.  I do love to pick wool when I get some in (like a beautiful Romney fleece I just picked up) or raw merino or the like.  

I decided to pick Rosalita (rose grey) fleece because she was just FULL of VM and little burrs.  I know that the finer animals are like velcro but she was ridiculously full of VM!!!  I actually was out doing herd health on Sunday and purposely held onto her a little while to see this year's fleece and yes - she is full of VM again - I am not sure if she just rolls in the hay purposely or what.  The other animals in her pen that are in her micron range are NO WHERE NEAR full of VM that she is!!  This is precisely why I have made the decision to coat all my alpacas after shearing this year that are under 23 microns.  I want to keep as much fleece clean and VM free as possible.  It is an investment, but the amount of usable fiber that will be saved will more than make up for the coat cost.  

I did not (because I didn't need to) pick Brandy's fleece.  She was already cleaned and carded and ready to go. 

Here are some pictures of Rosalita's fleece being picked.  The fleece goes into the back of the picker (this is a swing arm triple picker).  It has many, many sharp points to "open" up the fleece.  This is NOT a toy and can be quite dangerous (as all fiber prep tools can be), but is a necessary tool for fiber folks.  


Fleece being loaded into the picker

The fleece goes into the back of the picker and is "swung" through so that the teeth open up the locks.  It does get out lots of VM, but Rosalita was so dirty that there was still LOTS of VM even after picking.  


Fleece after picking, still lots of VM

Here is the picker before picking (clean) and after picking (VM and Sand).  I made the decision right there that this fleece will need to be combed rather than carder to make a usable lovely fiber.  I cleaned the picker after every ounce or so of picking - so it definitely help - but still needed combing to remove the VM further.


Before picking - clean (see all the teeth)
After picking (VM and sand) 


Step 6 - Washing the fleece
Note that this process is for alpaca, if you have sheep it is slightly different (and different for different wools).  After the fleece has been skirted, sorted, graded and blown out to remove even more debris, I take the fleece that I will use for a certain project and wash it.  You can wash in a sink, bath tub, muck bucket or old top load washer. Whatever the vessel is that you use, the process is the same.
  • Add detergent to the vessel (I typically use regular blue Dawn dish detergent).  You can also use many of the wool washes on the market or laundry detergent, but I like Dawn the best.  Just remember, you want to use the regular, un-concentrated Dawn without any of those enzymes boost chemicals. 
  • Add hot water (so that you can put your hands in it without saying ouch) and swish it around to distribute the soap.   You are not looking for bubbles, just distribution of the soap.
  • Now add the fleece.  Sometimes I put the fleece in a mesh bag (if I am doing more than one fleece at a time in a large vessel) and sometimes I just put it directly in the water.  Push the fleece down gently so that it all gets wet and is submerged.  DO NOT agitate.  Leave for 30 minutes.
  • Take the fleece out - DO NOT wring it.  Just take it out and put it aside and repeat the wash step again.  Again leave for 30 minutes. 
  • Take the fleece out - DO NOT wring it. Just take it out and put it aside.  Now fill the vessel with hot water again (rinse the vessel out if necessary).  This is the rinse cycle.  Push the fleece down again without agitating.  Leave for 30 minutes.  The rinse I typically do 3 times. 
  • After the 3rd rinse.  Take the fleece out, squeeze (don't wring) out the fiber and roll it up in a big bath towel to remove the excess water.  Now lay somewhere to dry.  I sometimes use my skirting table, an old sheet out on the lawn or my new favorite, a drying rack I made.  
My process is typically 2 washes and 3 rinses


The fiber mesh bag with Rosalita's fiber inside (not the best pic)


Soapy water waiting for the fleece.


Step 7 - Prepping the fleece


Meanwhile while Rosalita's fiber was bathing - I decided to prep Brandy's fiber.

Because I am a Clemes & Clemes distributor and the new blending board is now a part of my fiber tool arsenal, I decided to prep Brandy's fiber on the blending board.  Brandy's fiber was already carded on my drum carder. . . but it didn't need to be (you can place uncarded fiber on the board too).  I am in love with this blending board and I have been in rolag heaven. . . it is just so much fun!!!

Want your own blending board?  Get it here.  This links to my online store. 


  • I placed a layer of Brandy's fiber on the board as the first layer.  
  • Then I placed a layer of Tussah (golden) silk on the board
  • Then I placed a layer of firestar (red) on the board
  • I continued several times until the board was full 
  • I removed them as rolags (pic of rolags are NOT of Brandy's prep because I forgot to take a pic), but they are representative of the rolags I spin with and spun Brandy's fiber with.
  • I spun the yarn - the first ply is an evenly spun sport weight-ish ply that will be plyed with Rosalita's prep as soon as that is done. 


First layer - Brandy (brown alpaca)


2nd layer - Tussah Silk


3rd Layer - firestar


Some rolags from the board (but NOT for this fiber, forgot to take a pic of Brandy's prep)


The yarn - this is one ply (Brandy, silk, firestar) of a 2-ply yarn

Next time ---- Rosalita's prep . . . .


Saturday, January 19, 2013

Adopt-a-paca™ - Alpaca Cowl - Part 1 (In the barn)

Now that the craziness of the holidays have subsided, I thought I would do another series on creating a garment out of alpaca fiber. This is a garment that is being made for my Adopt-a-paca™ program. This cowl is being lovingly created for Heather and will be completely processed in my studio by me. 

In this particular series, we will be creating a cowl (neck warmer, snood, circular scarf).  The two animals that have donated fiber for this are Brandy (chocolate brown female) and Rosalita (rose grey female).  100% of the alpaca fiber in this cowl is grown on my farm and processed in my studio in NJ.  

If you would like to adopt and receive spinning batts, yarn or a scarf or cowl, please contact me. 

This series will go through each step of the process all the way to the finished product.


Part 1 will go through the part of prep that happens in the barn or outside.   

"Brandy - You're a Fine Girl" 
"Alma Park - Rosalita Vito"

Step 1 - Growing the Fiber
Alpacas are sheared only once a year and in my neck of the woods this occurs usually around the 3rd week of May. In NJ, the summers are too hot and humid for an alpaca to survive in full fleece as they are prone to heat stress.  A full years growth produces on average a 3 - 4 inch staple length and 3 pounds of prime (the best) fleece.  There are animals that grow much longer (I have a record 7.5 inches on my farm) and some shorter.  An older gal on my farm who has had many babies typically does not grow past 2 inches.  Prime fleece weight can also vary.  Some of my finer animals only produce 2 pounds and some of my larger breeding males produce 6 pounds.  Micron counts (fineness) ranges as well.  I categorize my fiber into 6 "grades" that range about 3 microns a piece.  The chart I use can be seen on my main website here.  In order to grow a good, healthy fleece, an animal must have optimal health.  Nutrition, environment, parasites, pregnancy, weaning and stress can all affect the fiber quality. As one who breeds for fiber production, these factors are of utmost importance and are monitored when I am sorting and grading the fiber.  I also use a  fiber test as a tool which can show weak spots in the fleece through a test we call "OFDA 2000".  It is a two part measurement.  The first part shows the average micron of the fiber and the second part is a graphical representation of the micron along the shaft of the fiber.  Higher micron typically occurs with spring grasses, lower with winter hay and generally varies a few microns throughout the year.  Sharp downward spikes on the graph can show illness, stress, weaning (for babies) or parasitism. If you have questions about your OFDA or other reports, feel free to contact me, I would be happy to discuss. 

This is Brandy's report from 2010 - as you can see she is 21.4 microns which is still considered baby and she was 3 1/2 years old when this report was done.  She did not change much in 2011 or 2012.  She is typically 3.5 - 4 inches in length and is a dream to spin.  She has no downward spikes in her second report which represents a healthy fleece with no weak spots.  Weak spots can break when carding, combing or spinning in the mill or even when being hand processed.  The weak spots can produces neps and noils, which is great for hand spun art yarn that I make (and get requests for noils and nepps in my spinning batts as well) but NOT what you want when you are sending 30 pounds of fiber to the mill in one batch and one animal causes issues in the whole lot.  It is best to make sure all the fiber in the batch is ALL healthy.  For me, I can do most of the grading by hand and also can "hear" weak spots, but I do still test about 30% of my herd each year (mostly young ones and my herdsires), so I can gauge breeding decisions etc.  


Average Micron Count Chart

Graphical Chart - Micron over the year


Step 2 - Shearing 
Check out this post on shearing to see how the fiber actually is harvested from an alpaca.  It is similar to sheep shearing, but alpacas are generally restrained.  

Step 3 - Skirting/sorting/grading the fiber 
I STILL have not finished my skirting video series - but here is a good intro to skirting by Wade Gease - an alpaca judge.  Click here for the blog post about it and the video.  

Step 4 - Blowing out or Tumbling the fleece 
Alpacas love to roll in the dirt!!  This makes for a pretty sandy fleece and in the case of very fine animals lots of VM (vegetable matter).  We actually have made the decision to coat our fine animals after shearing this year as it will make processing my fleeces easier and more fiber usable.  

I blow out my fleeces with a special blower to get out as much dirt and VM as possible.  It also helps to remove 2nd cuts (which are little short short pieces of fiber that are made when the shearer cleans up the body of the alpaca after the prime fleece is removed). 

I do not tumble my fleeces because in my experience, it embeds the 2nd cuts and VM even more so.  I know some folks swear by tumbling and maybe someday I will try it again.  


Next time. . . .Part 2 - we move into the fiber studio.